Digital Painting Tricks Techniques 100 Ways to Improve Your Cg Art
15 stunning examples of CG fine art
There are few jobs in the earth equally rewarding a working as a CG artist. Merely collaborating on a top movie, commercial or videogame may a dream for many, at the end of the day you're even so working for a client and realising their vision non yours. Which is one reason so many artists also spend their spare fourth dimension on personal CG art projects - where they can truly permit their imaginations and artistic run riot. Hither are some of our favourite examples...
01. Steampunk Butterfly

- Artist: Francesca Forzoni
- Software: Maya, 5-Ray, Photoshop
Francesca Forzoni is a CGI operator and freelance graphic designer based in London. This image took her most a month to consummate, and the aim was to create a very feminine, delicate piece.
"I used Maya, 5-Ray and Photoshop, she explains. "Everything was made from scratch, autonomously from some of the metal textures, which I got from CG Textures. My original inspiration for this piece was On Steampunk Wings, an illustration by Gwendolyn Basala."
02. African Woman
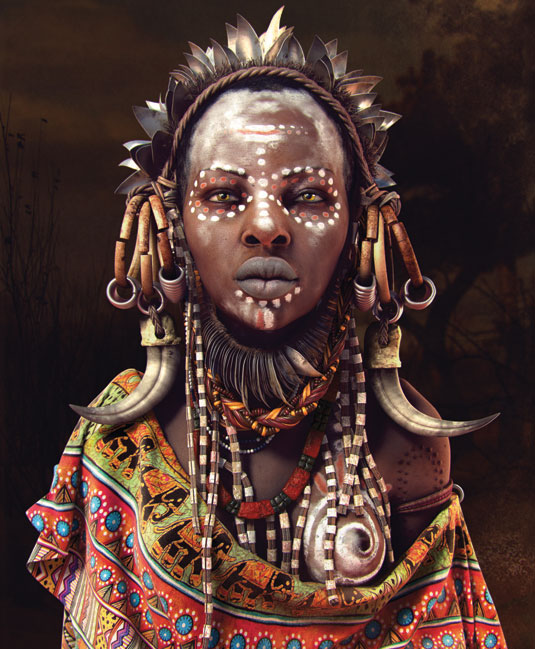
- Artist: Moises Gomes
- Software: 3ds Max, V-Ray, Photobrush, ZBrush, Topogun
Moises Gomes spent about a month and one-half working on this projection. "Information technology took me longer than usual as I spent a lot of time working on the return tests, the shading and the composition. Simply subsequently a lot of trial and error I reached the desired result.
"I used cloth simulation to arrive look more natural, and and so I used ZBrush for the final finishing touches and to accommodate the general proportions. All the modelling is my own work, while virtually of the textures came from www.cgtextures.com. The epitome itself was inspired by the many photographs I have seen of a similar nature, of women photographed in traditional African dress.
"I found this project quite challenging and there is certainly a lot of positives I tin take away from information technology - especially the way I have improved my organic modelling and shading skills - and I think my future piece of work will become more elaborate as a result. It was this challenging attribute of the project that I enjoyed the most. My favourite part is the eyes and the private embellishments and composition."
03. Lurking in the Deep
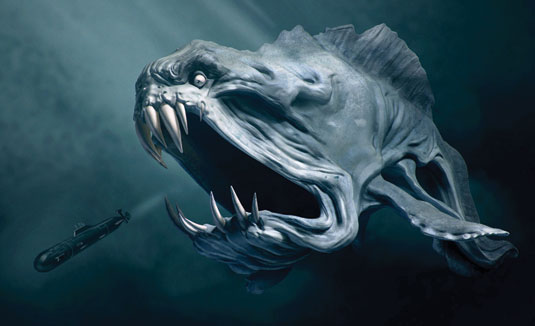
- Artist: Henning Sanden
- Software: ZBrush, Modo, Mudbox, Photoshop
Artist Henning Sanden really enjoyed coming up with this concept. "Information technology's a lot of fun doodling around in ZBrush, pushing and pulling shapes," he explains. "Along with lighting, this is ane of the stages I relish the most as y'all accept so much control.
The workflow for this image was pretty straightforward, he explains. "Information technology started of as a concept sculpture in ZBrush, which I retopologised then finalised before starting to texture in Mudbox. I extracted my various maps - spec, SSS colour, SSS amount and and so forth - from my texture map and brought information technology all into Modo for rendering.
Sanden completed the finishing touches in Photoshop. "Along the mode, I did several test renders just to make sure that my vision was strong all the way through. I worked on the epitome in my (rather limited) spare fourth dimension, and information technology took me about two months to complete."
04. Roofs, Rockets and Adventures Across
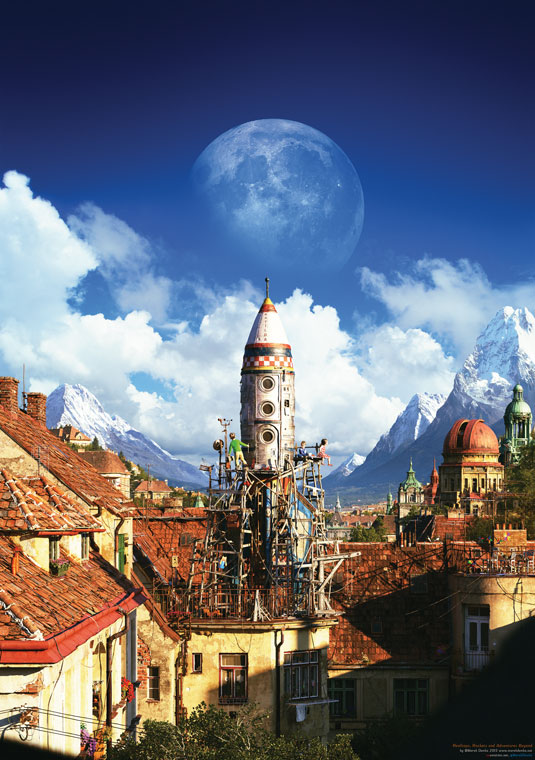
- Creative person: Marek Denko
- Software: 3ds Max, V-Ray, Photoshop
Marek Denko runs his own studio and, with three small children at dwelling, his spare time is limited - and so he worked on this image for several months. He really enjoyed the project though. "When I do have time for a personal project, I really go my teeth into it," he explains.
"They usually follow a similar workflow, though, with a quick idea, concept, proxy scene with base of operations lighting, details, details, details and then some colour corrections at the cease. I find endless pleasance in petty and adjusting until I am 100 per cent sure that I am satisfied with every single element. You can see a making-of video hither.
05. Sweet Assail

- Artist: Petr Vykoukal
- Software: 3ds Max, V-Ray, Photoshop, ZBrush
This scene took Petr Vykoukal most five months to create, working in his spare time. "Every bit scenes go, this is not a specially complicated 1 and as such the progress being made on information technology each 24-hour interval was really obvious and quite tangible," he explains.
"It was great to see the paradigm coming together bit by bit and knowing that each time I picked information technology upwardly it was a piffling chip closer to beingness completed. I did the main workings in 3ds Max and then completed the rendering in V-Ray before finally calculation some details in Photoshop and ZBrush.
Vykoukal's mean solar day job is Alien Studio, which does a lot of client work in ad and product visualisations. "So I relish personal projects like this to really let my personal creative juices menses," he adds.
06. Shroom
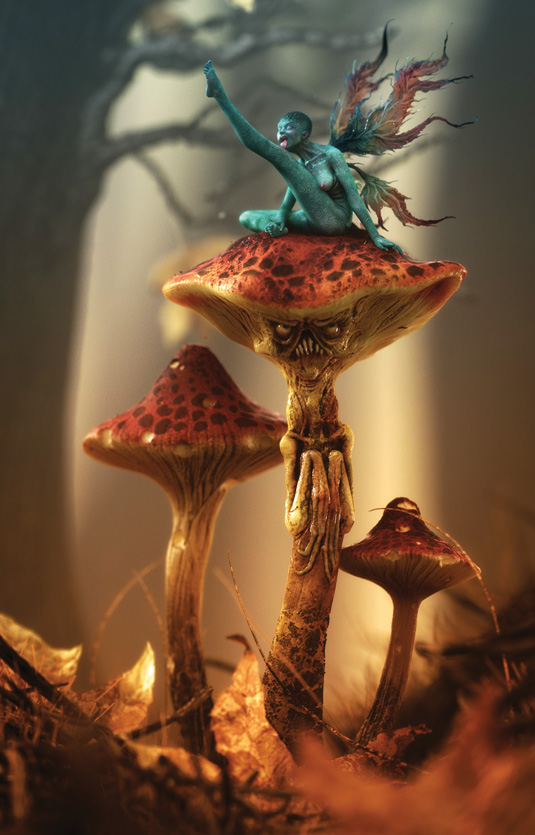
- Artist: Laurent Pierlot
- Software: 3ds Max, ZBrush and Photoshop
A CG artist for a game visitor, Laurent Pierlot does a multifariousness of things including character and environs modelling, shading/texturing lighting and compositing for game cine. This image took him most a calendar month to create using 3ds Max, ZBrush and Photoshop.
"I used 3ds Max's Hair&Fur for the grass, and I used a high-resolution mesh from ZBrush rather than doing displacement, he explains. "What I enjoyed most about creating this image was that I had no existent 2D concept to start with, and it was fun to meet my idea evolve."
07. The Army of Due east
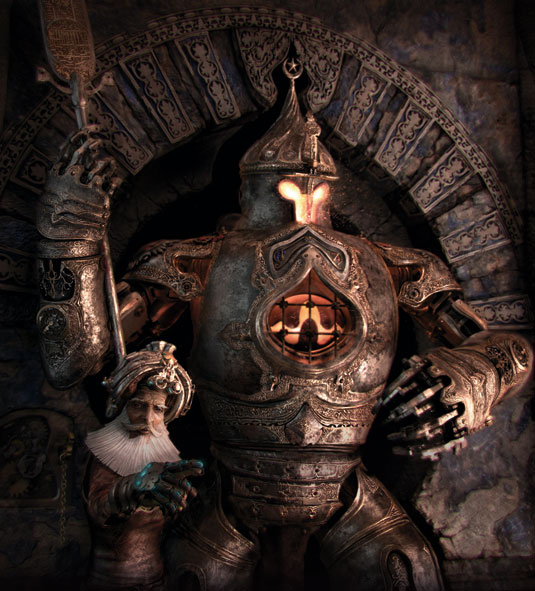
- Creative person: Onur Cayli
- Software: V-Ray, ZBrush, 3D-Coat, Mari, Photoshop
3D artist Onur Cayli, who's worked for major companies such as DreamWorks, Sony Pictures and Massive Black, spent around two months on this project. The idea was to create a slice of CG art similar in mode to oriental paintings with a hint of steampunk.
Cayli likes to sketch out the scene to achieve better lighting and a sense of atmosphere before fully rendering in V-Ray, he explains. "I also got some screenshots at different angles from Maya, painted black and white in Photoshop to go a good silhouette. And then, I added colour to check if the balance and contrast was good enough for the final image.
"When I was finalising the finished version, I approached it more than as a painting than equally just a render and tried several finishes earlier I was happy with the way it looked."
08. Southern Basis Hornbill
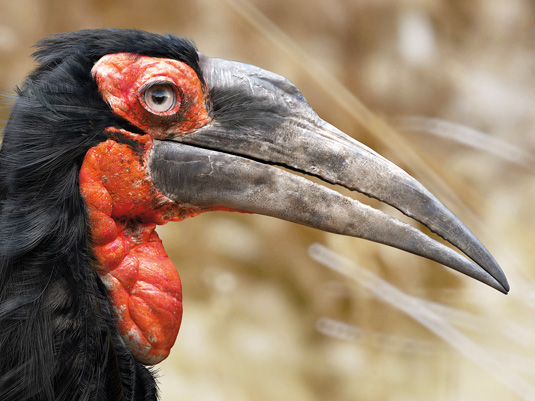
- Artist: Léandre Hounnaké
- Software: 3ds Max, Mudbox, Five-Ray, Photoshop
3D creative person Léandre Hounnaké is the founder of Pixel23, which produces hyperrealistic illustrations for advertising and product and architectural visualisation. He worked on this paradigm in his free fourth dimension equally a personal projection. From concept to concluding return, information technology took him about 2 months.
Hounnaké used Sculptris for the base of operations mesh and finished the prototype in 3ds Max and Mudbox, he reveals. "The rendering was washed with V-Ray, and I used MultiScatter and Hair and Fur to create the feathers."
The biggest claiming in creating the image was getting the bird to wait realistic and natural. "I actually enjoyed the texturing process and creating the feathers," he recalls. "I kind of forced myself to reach a certain level of quality."
09. Inspired by Light
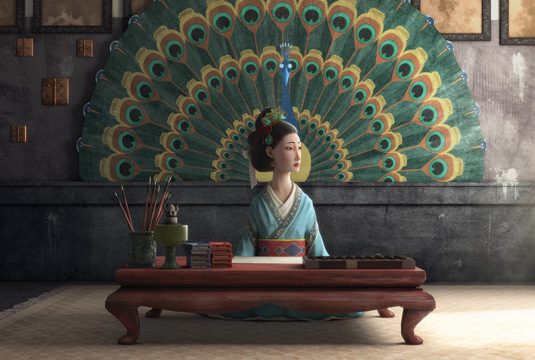
- Creative person: Giovanni Dossena
- Software: Maya, Mari, V-Ray, Nuke, Photoshop
Artist Giovanni Dossena drew inspiration for his image from a concept by Julia Sarda. "I really liked the thought of how the character was looking for inspiration from the light coming through the window," he explains.
The piece took him ii months to create from concept to finished return. He used Maya Hair System with Hair Shader in order to achieve a natural hairstyle. "Then I worked using a linear workflow with float data to gain a precise control over the lighting, which later on helped me in Nuke to blended correctly."
The thing he particularly enjoyed was trying to recreate the mood and feeling of natural light. "I wanted to create a connection between the female person grapheme and the low-cal coming in through the window," he adds.
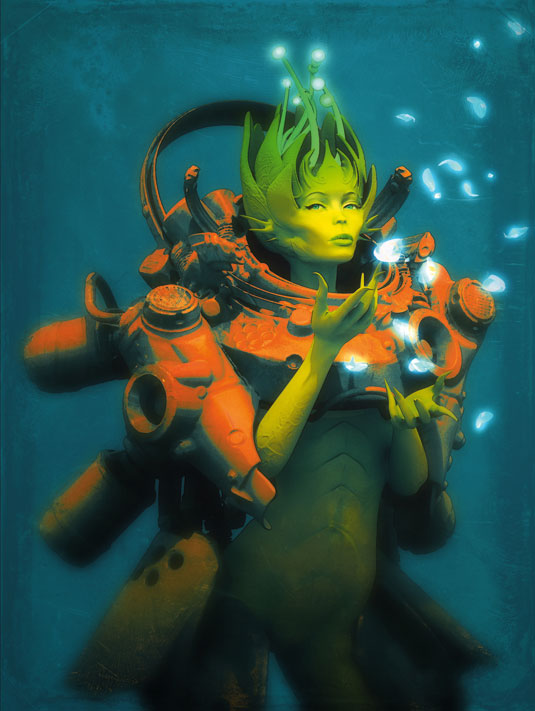
- Artist: Pascal Blanché
- Software: 3ds Max, ZBrush, V-Ray, Photoshop
Senior art director at Ubisoft, many of Pascal Blanché'due south sculpts come up together through "happy accidents", he says. He begins working on an idea without too much detail put into the concept phase. Though he adds that after years of creating characters, his library of models, costumes and props comes in handy when finding a starting betoken, and act as a valuable base to work from.
"About of the time I outset with a pose and composition of elements in 3ds Max, and then go into ZBrush to create the new elements I demand for the scene, he explains. "And and so get into more than particular for each and every office of my model. I and so export all those pieces back in 3ds Max and add layers of shaders and lighting. After the 5-Ray rendering, (that usually takes a couple of hours or more than) I then become into Photoshop to add together the terminal touches."
11. Mouflon
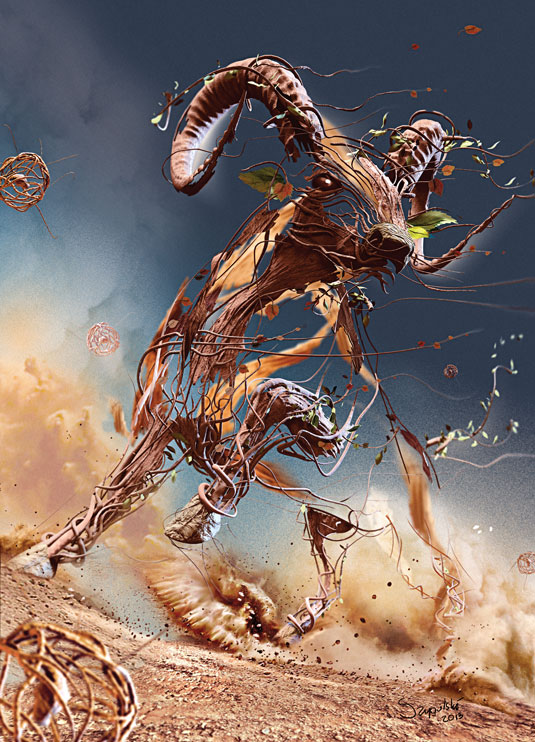
- Artist: Artur Szygulski
- Software: Blender, Photoshop
Polish artist and designer Artur Szygulski'south raging animal, created from entwined twigs, roots and branches, is a personal project called Mouflon. It's named later the animal itself, a subspecies group of wild sheep, Ovis aries.
The master goal was to capture the movement of the animal, the struggle of the creature as it fights for survival, says Szygulski, adding that he studied the real beast'southward move before venturing into 3D.
"I used Blender to create twigs and leaves and a few photos from CG Textures," he explains. "And then I took the image into Photoshop to create the background. Creating pictures in a 3D environment gives me more possibilities and enables me to find the best position for the lights and cameras."
12. Queen Of Death
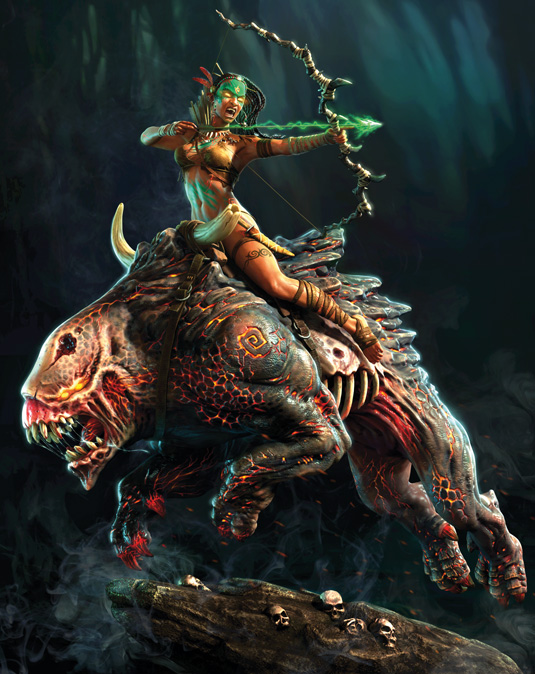
- Artist: Mridul Sen
- Software: Photoshop, Maya, Mudbox, TopoGun, mental ray
Working for DreamWorks in India equally a modeller, Mirdul Sen was inspired to create this paradigm by the work of Frank Frazetta. "It took around a month and a half to complete, working every day after office hours," he explains.
He started designing the concept in Photoshop, and then moved to a 3D workflow. Starting with a base of operations mesh in Maya, he and then carried out the sculpting and texturing in Mudbox.
"I did the topology in both Maya and TopoGun, then used mental ray for the renders. Finally, I composited the renders in Photoshop. I didn't ready whatever colour concept so I simply kept on playing with colours. Giving it the lava texture was my last-minute touch."
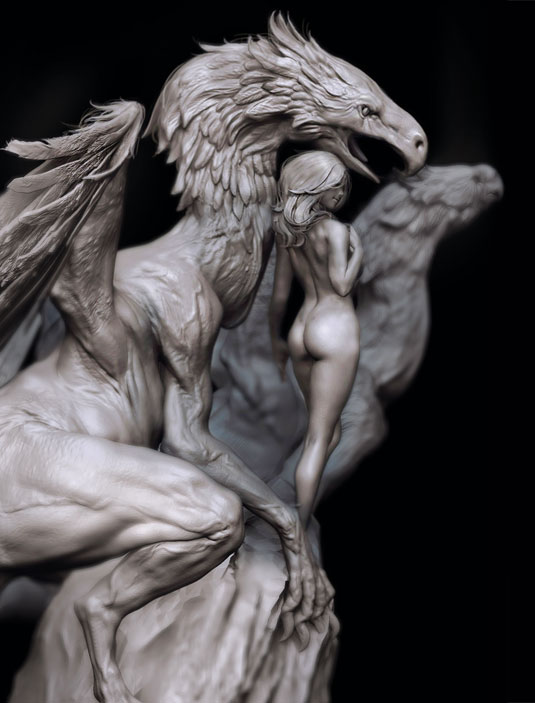
13. Mystery

- Artist: Tomasz Strzalkowski
- Software: ZBrush, Photoshop
Art director at a game development company, Tomasz Strzalkowski took nigh 10 working days to complete this stunning piece of CG. He used ZBrush for the modelling, texturing and rendering, and Photoshop for the composition and a footling post-processing work.
"The whole creation process was very enjoyable," he recalls. "I actually like to create, and when I have an idea, at first I do some sketches to endeavor to develop the idea. Next I make a uncomplicated 3D model and more sketches, once again based on this model – until I discover or discover the correct version from my head.
"Every fourth dimension I learn something new, it means that sometimes I will have some early on technical problems. This is annoying, of course, but it is a expert manner to amend my skills."
14. EGR-8 mobile welding machine
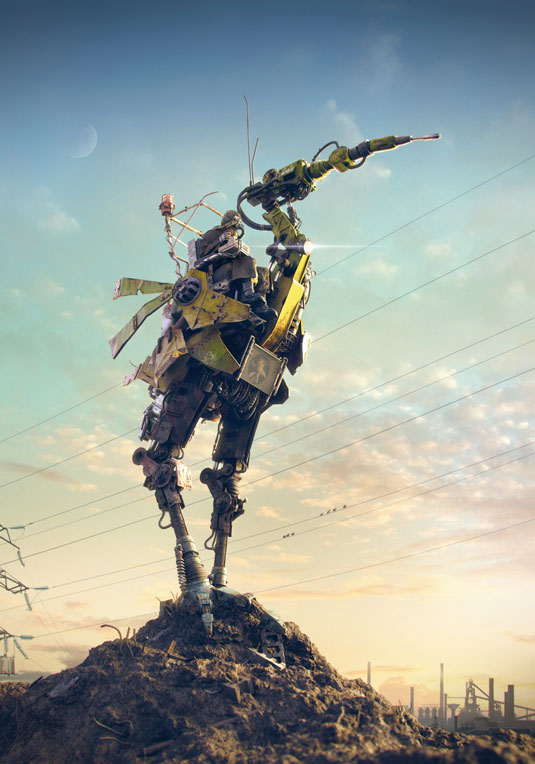
- Artist: Alikov Daniil
- Software: Maya, 5-Ray,ZBrush, Mudbox, Nuke, Photoshop
This image took Alikov Daniil near five months to complete and he used a range of different types of software. "The modelling, shading and lighting were all washed in Maya," he explains. "The materials and rendering though, were completed in V-Ray."
For the textures he used some from cgtextures.com and created others in Mudbox and Photoshop. "Final touches were likewise done in Photoshop while the compositing, color correction and postal service-effects such as depth of field and chromatic aberrations were washed in Nuke."
All the techniques were fairly standard, he says, with the exception of the fabric simulation in Maya for the human's coat. He also used V-Ray Proxy geometry to return out the basis and for elements on the human clothes. "I'thou really pleased with the last finish of this image," he says. "I think information technology has a futuristic element to it and yet at the same time feels quite contemporary."
15. Mistress
- Artist: Kim Hoyong
- Software: ZBrush, Photoshop
Videogame concept artist and sculptor Kim Hoyong loves the procedure of conceptualising a new character or brute, and we honey this stunning cosmos, which holds our attention with its mix of beauty and the creature, crude and smooth surfaces.
There'southward a wonderful tactile quality to Hoyong's work that brings his sensual characters to life. 'Mistress' took the artist a single weekend to create, and it turns out his work process is a little unusual.
"I have little patience, so I observe information technology difficult to sit in front of a monitor for any neat length of time," says Hoyong. "Instead, I go along the concept in my head for equally long as possible. The paradigm is almost finished in my head when I begin work. When the actual piece of work starts, it feels more like dictation."
Win a trip to Los Angeles!
Masters of CG is a competition for EU residents that offers the one-in-a-lifetime chance to work with one of 2000AD's nigh iconic characters: Rogue Trooper.
We invite you lot to form a team (of up to four participants) and tackle as many of our four categories equally you wish - Title Sequence, Master Shots, Film Poster or Idents. For full details of how to enter and to go your Contest Information Pack, head to the Masters of CG website at present.
Enter the contest today!
Related articles
Source: https://www.creativebloq.com/audiovisual/examples-cg-art-31411156
0 Response to "Digital Painting Tricks Techniques 100 Ways to Improve Your Cg Art"
Post a Comment